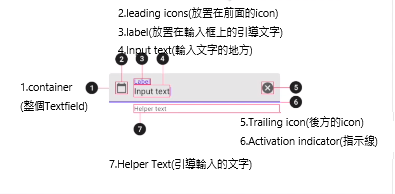
TextField主要用於輸入文字。其中的組件組成如下圖:
它的屬性很多。 此部件的作用在於輸入文字。
const TextField({(1)focusNode使用說明
Key? key,
this.controller, //控制器,用來獲得及設置此TextField的內容,沒有設置,系統會自己設置一個。
this.focusNode, //用於管理節點,設置節點名稱
this.decoration = const InputDecoration(), //輸入框的裝飾器
TextInputType? keyboardType, //設置不同的輸入類型
this.textInputAction, //用於控制鍵盤動作,默認為是完成TextInputAction.done
this.textCapitalization = TextCapitalization.none, //
this.style, //輸入文本的樣式
this.strutStyle,
this.textAlign = TextAlign.start, //輸入文本的位置
this.textAlignVertical,
this.textDirection, //輸入文字的排列方向
this.readOnly = false, //是否只能閱讀
ToolbarOptions? toolbarOptions,
this.showCursor, //顯示光標
this.autofocus = false, //自動獲取焦點
this.obscuringCharacter = '•',
this.obscureText = false, //是否隱藏輸入文字
this.autocorrect = true, //是否自動校正
SmartDashesType? smartDashesType, //
SmartQuotesType? smartQuotesType,
this.enableSuggestions = true,
this.maxLines = 1, //最多的行數
this.minLines, //最少的行數
this.expands = false, //
this.maxLength, //一行最大的長度
this.maxLengthEnforcement, //設定在達到最長的長度時是否繼續輸入
this.onChanged, //改變時的回調
this.onEditingComplete, //編輯完成的回調
this.onSubmitted, //點擊完的回調,會回傳輸入的框的值當作參數
this.onAppPrivateCommand,
this.inputFormatters, //輸入的格式
this.enabled, //輸入框是否能輸入
this.cursorWidth = 2.0,
this.cursorHeight, //光標的長度
this.cursorRadius, //光標邊角的形狀
this.cursorColor, //光標的顏色
this.selectionHeightStyle = ui.BoxHeightStyle.tight,
this.selectionWidthStyle = ui.BoxWidthStyle.tight,
this.keyboardAppearance,
this.scrollPadding = const EdgeInsets.all(20.0),
this.dragStartBehavior = DragStartBehavior.start,
bool? enableInteractiveSelection,
this.selectionControls,
this.onTap, //點擊輸入框時的回調
this.mouseCursor,
this.buildCounter,
this.scrollController,
this.scrollPhysics,
this.autofillHints = const <String>[],
this.clipBehavior = Clip.hardEdge,
this.restorationId,
this.scribbleEnabled = true,
this.enableIMEPersonalizedLearning = true,
(1-1)設置兩個節點
FocusNode node1 = FocusNode();
FocusNode node2 = FocusNode();
(1-2)在TextField中設置
focusNode: node1,focusNode: node2,(1-3)在onchange中加入以下程式,可跳至此部件中.
focusNode: node1,FocusScope.of(context).requestFocus(node1);TextField decoration
參考:
const InputDecoration({
  this.icon,  //小圖
  this.iconColor,  //小圖顏色
  this.label, //描述輸入框
  this.labelText,  //描述輸入框的文字
  this.labelStyle,  //描述輸入框文字的樣式
  this.floatingLabelStyle,
  this.helperText, //輸入框入方的輔助文字
  this.helperStyle,
  this.helperMaxLines,
  this.hintText,  //輔助文字
  this.hintStyle, //輔助文字的樣式
  this.hintTextDirection,
  this.hintMaxLines,
  this.errorText,  //錯誤訊息提示
  this.errorStyle,
  this.errorMaxLines,
  this.floatingLabelBehavior,
  this.floatingLabelAlignment,
  this.isCollapsed = false,
  this.isDense,
  this.contentPadding, //文字內距
  this.prefixIcon,  //文本字的小圖  prefixIcon: Icon(Icons.add)
  this.prefixIconConstraints,
  this.prefix, //於文本前加用通用組件 prefix: CircularProgressIndicator(),
  this.prefixText,
  this.prefixStyle,
  this.prefixIconColor,
  this.suffixIcon,  //於文本後加入小圖
  this.suffix, //於文本前加用通用組件 suffix: CircularProgressIndicator(),
  this.suffixText,  //於文本後加入文字
  this.suffixStyle,
  this.suffixIconColor,
  this.suffixIconConstraints,
  this.counter,   //位於輸入方右下方的小控件
  this.counterText,
  this.counterStyle,
  this.filled,  //是否要填充顏色
  this.fillColor, //填充的顏色,上為ture時才會填充
  this.focusColor,
  this.hoverColor,
  this.errorBorder,
  this.focusedBorder,
  this.focusedErrorBorder,
  this.disabledBorder,
  this.enabledBorder, //是否能使用邊框
  this.border,  //邊框設定
  this.enabled = true, //輸入框是否可使用
  this.semanticCounterText,
  this.alignLabelWithHint,
  this.constraints,
範例:
import 'package:flutter/material.dart';

void main() {
  runApp(const MyApp());
}

class MyApp extends StatelessWidget {
  const MyApp({Key? key}) : super(key: key);

  // This widget is the root of your application.
  @override
  Widget build(BuildContext context) {
    return MaterialApp(
      title: 'Flutter Demo',
      theme: ThemeData(
        primarySwatch: Colors.blue,
      ),
      home: const MyHomePage(title: 'Flutter Demo Home Page'),
    );
  }
}

class MyHomePage extends StatefulWidget {
  const MyHomePage({Key? key, required this.title}) : super(key: key);

  final String title;

  @override
  State<MyHomePage> createState() => _MyHomePageState();
}

class _MyHomePageState extends State<MyHomePage> {

  TextEditingController controller1 = TextEditingController();  //宣告文字控件,之後可利用控件取出該部件的文字


  @override
  void initState() {
    super.initState();
    var controller_text=controller1.text;

    controller1.addListener(() {
      //裡面可寫要對這個文字控件執行的工作


    });  //程式初始化時對controller1監聽,只要有變化就執行
  }


  @override
  void dispose() {
    super.dispose();
    controller1.dispose();  //結束時,釋放controller1記憶體
  }

  @override
  Widget build(BuildContext context) {
    return Scaffold(
      appBar: AppBar(
        title: Text(widget.title),
      ),
      body: Center(
        child: Column(
          mainAxisAlignment: MainAxisAlignment.center,
          children: <Widget>[
            TextField(
              controller: controller1,
              //用於控制鍵盤右下角送出那個鍵的樣式,默認為是TextInputAction.done,尚有"go"、"send" 或 "search"  "next" 或 "previous"等。
              textInputAction: TextInputAction.done,
              //輸入時的文字樣式 .characters輸入時全部大寫文字 .nono沒有限制 .senence 句子首字大寫 .word 每個單詞首字大寫
              textCapitalization: TextCapitalization.words,
              //文本對齊的方式,在輸入框的那個部位 .start開始 .justify平均分散 .left左邊 .right 右邊 .end 結束
              textAlign: TextAlign.left,
              //鍵盤輸入限制類型 .number .text .phone .datetime .emailAdress .url
              keyboardType: TextInputType.number,

              //文字的樣式,大小顏色等。
              style: TextStyle(color: Colors.blue, fontWeight: FontWeight.w500),

              //光標相關設定
              cursorColor: Colors.blue,
              //光標顏色
              cursorRadius: Radius.circular(16.0),
              //光標邊角形狀
              cursorWidth: 16.0,
              //光標寬度
              cursorHeight: 8.0,
              //光標長度

              maxLength: 99,
              //最多的字數
              maxLines: 4,
              //最多有幾行 ,null是沒有限制
              minLines: 1,
              //需與maxLines共同使用

              //以星號代表輸入文字,設定此為ture時,maxLines不能超過一行
              //obscureText: true,

              autofocus: true,
              //自動選擇焦點
              autocorrect: true,
              //是否自動校正文字
              //點擊時回調
              onTap: () {},
              //改變時回調
              onChanged: (v) {},
              //完成時回調,完成文字
              onSubmitted: (v) {},
              //輸入時回調
              onEditingComplete: () {},
              //裝飾器
              decoration: InputDecoration(
                labelText: "測試輸入",
                hintText: "預設文字",
                //放入輸入框之前 abc
                icon: Icon(Icons.abc_outlined),
                //於輸入框內的最前面 人像
                prefixIcon: Icon(Icons.person),
                //於輸入框的文字
                prefixText: '姓名:',
                //suffixIcon: Icon(Icons.tab,),
                suffixIcon: IconButton(
                  icon: Icon(Icons.abc),
                  onPressed: () {},
                ),
                //於輸入框後的小圖,使用IconButton便可以使用onpressed屬性
                suffixText: '321', //放於輸入框後的文字
                helperText: 'help',
                //輸入框下的協助文字
                border: OutlineInputBorder(
                  borderRadius: BorderRadius.all(Radius.circular(16.0)),  //改成有圓角的輸入框
                ), //加入邊框
                //counter: Text("自定義計數 0/maxLength"), //右下角的計算器,不設定會計算剩餘字數
              ),
            ),
          ],
        ),
      ),
    );
  }
}
參考文件:

沒有留言:
張貼留言